Pages

Sunday, 21 July 2024

First Plugin Changing the Buoyancy Model

I read the implementation of the buoyancy model in Gazebo. I understand the authors' motivation for implementing it in a generic way, which includes simulating two environments and allowing motion above what would be considered the surface line. In my case, I want to define any height above a certain Z value as the surface of the water.

To achieve this, I will modify the buoyancy to be equal to the weight of the vehicle when its position is at or above Z. The reason for this modification is that my vehicle is designed to have a ballast system that initially provides positive buoyancy. During the setup, the ballast system transitions to negative buoyancy, allowing the vehicle to perform an initial dive to a launch depth. This approach minimizes the distance required to test control algorithms, thereby optimizing the testing process.


My code modification is below


///////////////////////////////////////////////
// Compute Buoyancy at level Z=0
//////////////////////////////////////////////////
math::Vector3d BuoyancyPrivate::ComputeBuoyancyForce(
  const math::Pose3d &linkWorldPose, const math::Vector3d &gravity, double volume, double mass) const
{
  double fluidDensityAtPose = this->fluidDensity;
  math::Vector3d buoyancyForce;

  if (linkWorldPose.Pos().Z() >= 0)
  {
    // Buoyancy force equals vehicle weight at Z = 0
    buoyancyForce = mass * gravity;
  }
  else
  {
    // Standard buoyancy calculation
    buoyancyForce = -fluidDensityAtPose * volume * gravity;
  }

  return buoyancyForce;
} tag

I tested my plugin by placing the vehicle at Z=1


After Starting the simulation I can see the vehicle dropping but not sinking

The vehicle at this point has neutral buoyancy so stays in the location where it lands.


ChatGPT+Gazebo=Problems......


Background

Ten years ago, I attempted to learn Gazebo for my PhD but found the online guides and resources highly fragmented and inconsistent. The constant updates and structural changes made the learning curve steep, especially for a hobbyist approach. Consequently, I abandoned the platform in favor of Matlab, where I was already running simulations.

Initial Attempts with ChatGPT

Installation Guide

My first approach was to ask ChatGPT for a guide to install Gazebo and ROS2. As anticipated, this was not successful because ChatGPT lacked access to the latest versions and accurate literature.

Understanding IMU Units

Next, I provided specific Fortress literature to ChatGPT, requesting a detailed explanation and guidance on modifying the blue vehicle to include two IMUs. This approach was successful, and I managed to add two IMUs to a vehicle and run it.

Challenges with AUV Example

When attempting to run the AUV example, ChatGPT struggled, primarily due to the vast amount of outdated or irrelevant information it was trained on. The complexity and collaborative nature of the Gazebo and ROS2 repositories posed additional challenges, as did the difficulty in distinguishing between different software versions in forum content.

Effective Strategies for Learning with AI

To effectively use AI tools like ChatGPT for learning Gazebo and ROS2, I adopted the following strategies:

  1. Provide Specific Codes and Context: By supplying the exact codes from my installed version, I helped ChatGPT offer more relevant and accurate assistance.
  2. Ask Pinpointed Questions: Narrowing the scope of my questions and setting clear limits ensured that the suggestions remained within the relevant context.
  3. Utilize Official Documentation: Supplementing AI assistance with official documentation and specific version details enhanced the overall learning experience.

Conclusion

While AI can be a valuable tool in learning complex software, it is essential to provide precise context and limit the scope of inquiries to get the most relevant and accurate assistance. Combining AI support with official resources and community engagement creates a more effective and manageable learning pathway for Gazebo and ROS2.

Sunday, 30 June 2024

Set up a VM to run Gazebo and ROS2

More than a tutorial, this is going to be a summary of the links I used and the hiccups I found in the process of learning Gazebo and ROS 2.

I installed an Ubuntu 22.04 VM. One important thing to consider is that Gazebo requires significant CPU power, so at least 3-4 cores are needed for the simulations to run smoothly.

These are the steps that I followed for the VM:


Step 1: Download and Install VirtualBox

  1. Go to the VirtualBox website.
  2. Click on "Download VirtualBox."
  3. Choose the appropriate version for your operating system (Windows, macOS, Linux).
  4. Download and install VirtualBox by following the on-screen instructions.

Step 2: Download Ubuntu 22.04 ISO

  1. Go to the Ubuntu website.
  2. Click on "Download" for Ubuntu 22.04 LTS.
  3. Save the ISO file to your computer.

Step 3: Create a New Virtual Machine

  1. Open VirtualBox.
  2. Click on "New" to create a new virtual machine.
  3. Enter a name for your VM (e.g., "Ubuntu 22.04").
  4. Choose the type as "Linux" and the version as "Ubuntu (64-bit)."
  5. Click "Next."

Step 4: Allocate Memory (RAM)

  1. Allocate the desired amount of RAM for the VM. A minimum of 2 GB (2048 MB) is recommended, but 4 GB or more is preferred for better performance.
  2. Click "Next."

Step 5: Create a Virtual Hard Disk

  1. Choose "Create a virtual hard disk now" and click "Create."
  2. Select "VDI (VirtualBox Disk Image)" and click "Next."
  3. Choose "Dynamically allocated" and click "Next."
  4. Set the size of the virtual hard disk. A minimum of 25 GB is recommended.
  5. Click "Create."

Step 6: Configure the VM Settings

  1. Select your newly created VM and click on "Settings."
  2. Go to the "System" tab, then the "Processor" tab, and allocate at least 2 CPU cores.
  3. Go to the "Storage" tab, click on the empty optical drive, and choose "Choose a disk file."
  4. Select the Ubuntu 22.04 ISO file you downloaded earlier and click "Open."
  5. Go to the "Network" tab and ensure that "Attached to" is set to "NAT."

Step 7: Start the VM and Install Ubuntu

  1. Click "Start" to boot the VM.
  2. The VM will boot from the Ubuntu ISO. Select "Install Ubuntu" from the menu.
  3. Follow the on-screen instructions to install Ubuntu. This will include selecting your language, keyboard layout, and installation type (usually "Erase disk and install Ubuntu" for a clean installation).
  4. Set your timezone, create a user account, and set a password.
  5. Continue with the installation process. This may take some time.

Step 8: Complete Installation and Reboot

  1. Once the installation is complete, you will be prompted to restart the VM.
  2. After restarting, you may need to remove the ISO from the virtual drive. Go to "Devices" > "Optical Drives" > "Remove disk from virtual drive."
  3. Restart the VM again if necessary.

Step 9: Install VirtualBox Guest Additions (Optional but Recommended)

  1. With the VM running, go to "Devices" > "Insert Guest Additions CD image."

  2. Open a terminal in Ubuntu and run the following commands to install the necessary packages:

    sudo apt update sudo apt install build-essential dkms linux-headers-$(uname -r)
  3. Mount the Guest Additions CD if not already mounted, and run the installer:

    sudo /media/$USER/VBox_GAs_*/VBoxLinuxAdditions.run
  4. Reboot the VM after the installation is complete.

Now you have Ubuntu 22.04 installed and running in a VirtualBox VM!


Gazebo Installation

As I have ubuntu 22.04 the guide recommends gazebo fortress

The following are the instruction from Gazebo ignition fortress.....

https://gazebosim.org/docs/fortress/install_ubuntu

Binary Installation on Ubuntu

Fortress binaries are provided for Ubuntu Bionic, Focal and Jammy. All of the Fortress binaries are hosted in the osrfoundation repository. To install all of them, the metapackage ignition-fortress can be installed.

First install some necessary tools:

sudo apt-get update
sudo apt-get install lsb-release wget gnupg

Then install Ignition Fortress:

sudo wget https://packages.osrfoundation.org/gazebo.gpg -O /usr/share/keyrings/pkgs-osrf-archive-keyring.gpg
echo "deb [arch=$(dpkg --print-architecture) signed-by=/usr/share/keyrings/pkgs-osrf-archive-keyring.gpg] http://packages.osrfoundation.org/gazebo/ubuntu-stable $(lsb_release -cs) main" | sudo tee /etc/apt/sources.list.d/gazebo-stable.list > /dev/null
sudo apt-get update
sudo apt-get install ignition-fortress

All libraries should be ready to use and the ign gazebo app ready to be executed.


Learning Gazebo and Ros 2

 I have been thinking about building my own AUV for algorithm testing. I also have the corrected parameters from Preterus' thesis and my own thesis AUV parameters. I was considering building the robot and coding it as I had done before, but I know that the inertial navigation system is going to be a challenge (as always). So, it would be good to simulate the system. I went online and saw that, after many years, Gazebo now has a buoyancy module and can simulate AUVs. I tried to use Gazebo for my PhD, but at that time, the modules were not complete, and literature for the system was non-existent. Crossing my fingers, hoping it's better this time.

Let's start...

My current objectives for Gazebo:

a) Set up a VM to run Gazebo and ROS2

b) Run the vehicle blue tutorial

c) Add a double IMU to the vehicle as a test

d) Run the AUV demo

e) Add my first sensor to the AUV model

f) Create a plugin to have a ballast system to change the vehicle weight

g) Add IMU, compass, and GPS to Gazebo

Tuesday, 26 May 2015

HOW TO GET A CAE SOFTWARE FOR YOU COMPANY?

Imagine this situation, you arrive to a company that want to start to use FEA and you are the only engineer in the company that has ever use FEA software. What do you do? Where do you start?
It is a very difficult situation. There are some guides over the network of how to choose the best software. How to test the software but they do not take in account something that the management department is going to ask you always, how much it is cost?
I will like to give a little of clarity over what I did in the last year when I started the department of FEA in my actual company.
I’m going to give a little background, I was hire to run FEA for a company of Non-destructive testings for oil storage tanks under the norm API 579 and API 653.
I arrive to the company and I didn’t have hardware or software to work with it.
On this case I have to study what types of simulations will be required for my requirements, as always google is our friend. In a week I could establish that

  1. linear structural, 
  1. nonlinear structural, 
  1. thermodynamics    
  1. and transient simulation

will be required for my needs.

Then there is time to call some suppliers and write mails asking for quotations.
You search the web for the CAE software providers and get a lot of names
On this opportunity I contact:


  • Solidworks
  • Ansys
  • Comsol
  • Autodesk
  • MSC Nastran


The ones that I forgot or I knew they will expensive

  • Abaqus
  • Midas NFX
  • And others


(If you know of one please let me know is good to know of other software)
Now the interesting part
1.       How are you going to test this companies?
For testing the companies I decided that I will email them asking for a quotation and explaining them my needs, sector of work and type o simulation that I usually will carry on. As usual they will answer you that they will want to do a presentation of the software and talk to you in a meeting. ”never take a decision based in a power point presentation”.
For the meeting are some clear points to have in mind.
If they arrive without a quotation or they start to talk about prices depending of company size or they denied to give a clear quotation. You can start to put bad marks to that company.
Ask :
How is the technical support?
How do you get help with a project?
Where do you learn the software?
How is the license?
How do you scale your license?
Can they help you with a license upgrade for a limited time if you have a different project?
2.       How are you going to test the software?
This part is easy create a similar model to what you are going to do usually and test the different modules that you are going to be provide. If you have any problem test the support from the company it doesn’t matter if you do not have question ask them dumb questions. You have to test the support.

I imagine that you want to know how this companies rank on this aspects in my case:

ANSYS
The favourite company from my boss. All engineers have some knowledge of ANSYS or they had hear about it. Let me explain how ANSYS works in a corporative level. You do not acquired a license from ANSYS but from one of the subsidiary companies. If you are not a big company you will not receive support directly from ANSYS but from the subsidiary. One of the things that I hate is that subsidiaries most of the time are a competitive company of your company. How?, in oil and gas industry you fight for a contract with other companies they offer to do the service with ANSYS but they do not have ANSYS, they contract this subsidiaries to do the job for them.
Some subsidiaries have prices depending of the company and the support to get you running is not good. You have to take a course with them and if you have question over a particular problem is in your own if you do not get each year the support license. The price is expensive vs other companies with the same package. The software works well over the test but they were eliminated for the low technical support over time.

COMSOL
I like this company, I didn’t know how to use the platform, the price were under ANSYS cost and the expandability was great. They offer help for get me running but that was the part where they fail. I create a model and as soon I exported the model to COMSOL I get a problem I wrote the mail to the sales person that was helping me but I never get an answer. I assist to a meeting to learn the software but the representative was a little rude with bachelor student that were in the same room. I tried to consider the software but they were eliminated because I couldn’t test the software.

Solidworks Simulation
This company surprise me, the software behaves well, and the test was smooth and very easy to learn. I had used the cfd module before but the FEM module was equally great to use .The online communities give you all the support to do any project and the technical support from DSS assault is really good. At the end was a decision of market placement. My boss didn’t like the name and it was a fear that the client will not like the brand.

Autodesk Simulation
The old ALGOR software lives inside of this software, as an inventor user was very easy for me to adapt to the use of the simulation software. The online support through the forum is excellent with the support of expert user and members of Autodesk official support. I believe that they understand that student need support to learn their software. The technical test was not so smooth I have to twice some thinks but and the end the results were good. The price was good for the company and together with solidworks were my recommendations to be acquired.

How do you expose your opinion to your boss

You have to calculate rate of return. How many project do you have per year how much is going to be recover per project and you can know how much is your return per year. If is positive your boss is going to be happy and that is all what he is interested in.


Tuesday, 7 October 2014

Seismic Tank Sloshing

This is a duplicated post from the forum of autodesk cfd simulation 

I work for a company that do simulations for oil tanks...In the last days we test CFD simulation because we wanted to do the simulation of sloshing of a tank when a seismic load is applied.
A natural frequency study is not enough for this simulations and we require a more precise simulation.

 As many people ask in the forum of how to setup free surface simulations and I believe that the tutorial of CFD is not clear enough.
I'm Going to explain how I did the simulation.
My first step was to get the accelerations in X,Y,Z for a specific earthquake.
I download the files from http://peer.berkeley.edu/smcat/search.html I suggest these files http://peer.berkeley.edu/svbin/Detail?id=P1083 you have to download the accelerations of UP,NS,EW they are equal to X,Y,Z.
The file are read from left to right and up to down with a time between measure of 0.005 second and the values are in g. to use this data in CFD it is need to translate the information into a simple column and mm/s3. I am attaching a small xls that i wrote to process the data.(to paste the data use the paste assistant of excel) I create the model in Inventor and exported to autodesk CFD.

I set the fluid as diesel.
I set the upper boundary as 0 pressure surface and the low volume as initial height of fluid.
Know we can setup the free space model.
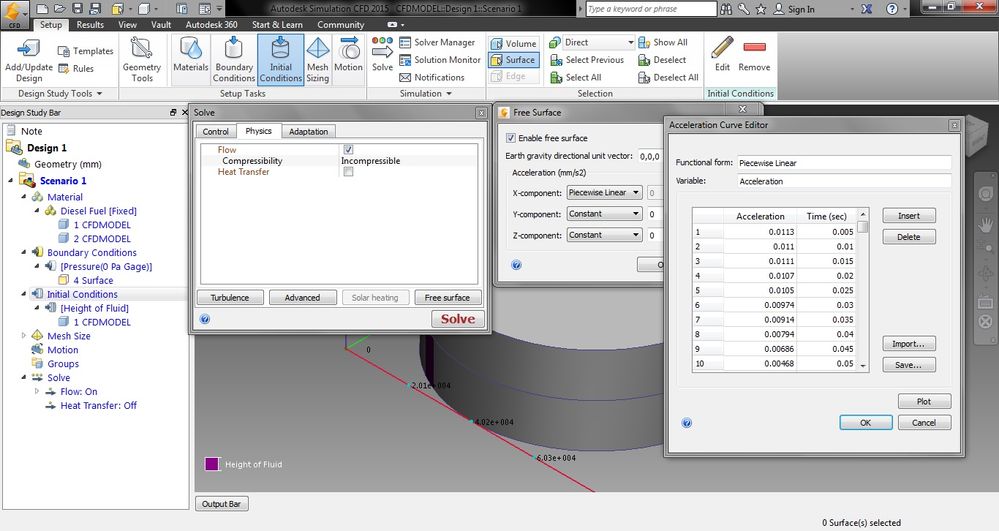
Solve/physics/free surface

set the gravity in the direction you want in my case is 0,0,-1 and I set the tables of accelerations . The first step to set the tables is to save a blank file . that file is going to be your base *.csv file where you are going to paste the yellow data of my excel after editing that file in excel you can import the file to CFD
You have to do the same for all axis. place the files inside of the same folder of the design number in my case design 1 folder.
The time step size has to be less than 0.005 s or the simulations is not going to be good.

The only question that i couldn't solve is how to obtain a good surface mesh between the volumes i want a initial flat surface.
However the results are good


Monday, 28 October 2013

CMAC-PID in a AUV


The first step in the implementation of a CMAC-PID was the modeling of the vehicle in Simulink. Dr. Cheng Chin (Chin et al. 2006)create a symbol library for modelling of ROVs. The library provided a predefined models that can be change by a simple script in Matlab.
Figure 62  6 DOF AUV unperturbed system
As second step in the implementation of the CMAC-PID is to implement a normal PID controller. The PID component of the system was implemented in Matlab. The acceleration wanted is calculated with a script that divide the input velocity by 8 and if the velocity wanted is equal to the platform speed the acceleration is equal to zero .A value limiter was placed at the output of the system to avoid saturation of the actuators. The tuning values for the PID components were estimated giving as result:
Kp=[16 14 24 34 34 14];
Kpi=[0.01;0;0;0.01;0.01;0.001];
Kdl=[0.002 0 0 0.001 0 0];
Kd=[1.5 0.9 1.5 7 6.2 0.1];

Figure 63 PID Implementation
The implementation of the CMAC component was by the constant call of a script at a sample time of 0.01 seconds. A CMAC was implemented by each one of the DOF’s .In the first 100 cycles is calculated the maximum and minimum data points. As second step the neural networks is started. For each cycle the weight values are adjusted. The adjustments values for the CMAC are m=5,  and  .Appendix 3 c). Figure 63 show the respond to a step input in all DoF. The respond of the PID is calibrated to the fastest answer with a minor overshoot. In rotation movement and vertical motion, the system show low overshooting and fast stabilization. In lateral motions it is notice a overshooting. However the overshooting can be solved reduce the acceleration rating of the robot. Figure 65 provide the different between CMAC-PID and a normal PID in the principal signal with overshooting. The result show a minor change on the signal and a reduction on the overshooting. If the step signal is change for a sinusoidal signal the CMAC-PID show a higher importance in the maintenance of the resonance frequency of the system over the time.
Figure 64 PID position respond to a Step Input [10,5,5,0.7,0.7,0.7]
Figure 65 CMAC-PID Implementation
Figure 66 PID(RED)vs. CMAC-PID (Brown)